
- Print Business Cards in Sugar Land – Same Day Service
- Copying Services
- Document Printing, Finishing & Lamination in Sugar Land
- Flyers
- Print Banner in Sugar Land | Same-Day Banner Printing Near Me
- Graphic Design
- Photo Printing
- Postcard Printing
- Document Printing
- EDDM Full Service Postcards
- FotoZoomer Large Format Printing


Return Shipping Label USPS, FedEx and UPS: Create & Print.
FREE Label Printing for All Drop-Off Shipments in Sugar Land!
Businessmailboutique
11645 S. Hwy 6
Sugar land, Texas 77498 United States (US)
Email: info@businessmailboutique.com
Route
You’re standing at the counter with a packed box, a return label in hand, and one question that decides whether the parcel moves cleanly or gets delayed: where does this USPS return shipping label fit into the full return process? For most shippers, the label isn’t the end of the task. It’s the point where billing, timing, scan quality, and drop-off choice all have to line up.
Table of Contents
- How USPS Return Labels Fit Into a Real Returns Workflow
- Information and Format Requirements for a Valid USPS Return Label
- Three Ways to Deliver the Label to the Recipient
- Printing the Return Label Correctly Every Time
- Choosing Where the Package Actually Gets Mailed
- Handling Expired Labels, Refunds, and Reuse Edge Cases
- Pre-Shipment Checklist for a Clean USPS Return
How USPS Return Labels Fit Into a Real Returns Workflow
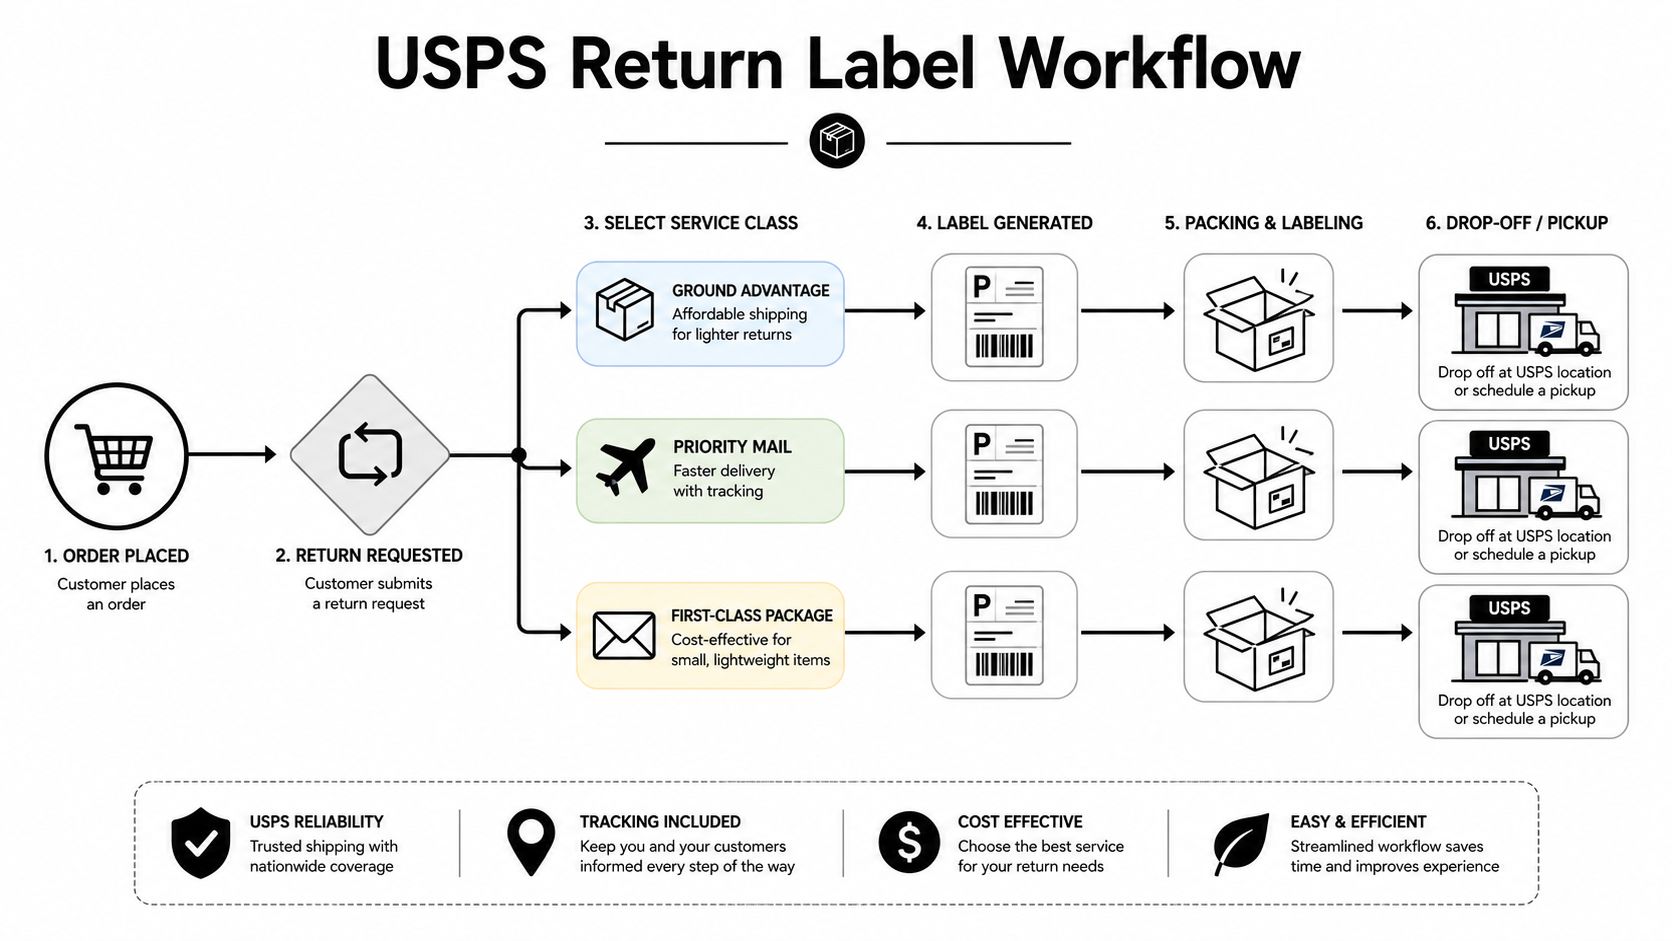
A return shipping label USPS workflow starts before anyone prints anything. The merchant has to choose the service class, decide who pays postage, and set up the return so it stays tied to the original outbound shipment. USPS says a return label must be linked to an original outbound Click-N-Ship label and used within 30 days of the ship date of that outbound item, so the clock starts earlier than many realize. USPS also says the return label is free until used, and the shipper is charged only after the recipient uses it, which means finance teams should plan around scanned returns, not issued labels, as described in the USPS Click-N-Ship FAQ.
Start with the outbound shipment, not the return sticker
That rule changes how returns should be managed. If a label sits in an inbox for too long, it may still exist, but it may no longer fit the original shipment rules cleanly. The practical mistake I see is merchants treating every issued label as a sunk cost the moment it’s generated. USPS’s billing model doesn’t work that way, and that matters when inventory is waiting on an RMA queue.
Practical rule: create the return only when the customer is ready to use it, or when your support team can keep the label moving inside the valid window.
USPS also standardized major domestic return branding in 2024, with official markings for Priority Mail Express Return, Priority Mail Return, and USPS Ground Advantage Return. That matters because the label isn’t just a shipping receipt, it’s part of a controlled workflow inside USPS’s digital return system. The broader point is simple, the more carefully the merchant sets the service class up front, the fewer surprises show up at drop-off.
For a merchant-side view of how return handling can support customer experience, the Ecommerce Boost returns guide is a useful companion resource.
Think in terms of scanned returns, not printed ones
USPS’s own usage data shows this workflow now runs at scale, with Click-N-Ship customers creating more than 32 million labels and generating nearly $385 million in sales in 2024. USPS also describes reprinting, exporting records, and creating return labels from order history in its Shipping History guide, which is a good sign that return labels have become a tracked, account-based process instead of a one-off counter task, according to USPS Click-N-Ship data and history details.
That’s why the best operating question isn’t “Did we issue the label?” It’s “Did the label get scanned, and was it still valid when the parcel entered the mail stream?” If your team answers that correctly, the rest of the workflow gets easier.
Information and Format Requirements for a Valid USPS Return Label
USPS return labels have to be readable, not just look good on a screen. A valid label needs the correct address blocks, a service indicator, and a barcode that USPS sorting equipment can read. USPS’s format rules also matter because returns are often repacked, re-taped, or handled twice, which is where sloppy placement causes the most trouble, as outlined in the USPS Domestic Mail Manual archive on return labels.
The label has to survive the sorter
USPS says standard return label sizes are 3×6, 4×4, or 4×6 inches, and other sizes need USPS approval. Labels prepared under USPS return services must include an Intelligent Mail package barcode, while Parcel Return Service labels use GS1-128 symbology with service type code 58. That’s not decorative detail. It’s what lets the piece move through the mail without manual intervention.
| Element | Requirement |
|---|---|
| Label size | 3×6, 4×4, or 4×6 inches, other sizes need USPS approval |
| Barcode | Intelligent Mail package barcode for USPS return services |
| Parcel Return Service | GS1-128 symbology with service type code 58 |
| Placement | Flat on the longest side, no folds, no overlap |
| Old markings | Cover prior labels and routing marks |
USPS also instructs shippers to place the label parallel to the longest side, keep all labels on one side, avoid folding or overlapping labels, and cover old markings. Those instructions reduce mis-sorts and scanner failures, especially when a customer has reused a box or repacked the item after opening it.
Good paper and clean edges matter more than people expect
At the counter, the labels that scan cleanly are the ones that stay flat. A glossy or well-backed adhesive stock usually holds shape better than flimsy paper, but the bigger issue is print quality and placement, not brand names on the paper pack. If the barcode is bent over a seam, it’s much more likely to get rejected by the scanner.
Keep the barcode zone clean, leave quiet space around it, and don’t trim the label into a custom shape just because the printer makes it easy. USPS is built around standard formats, and the easiest way to make the system work is to stay inside those formats.
Three Ways to Deliver the Label to the Recipient
USPS return labels can reach the customer in three practical ways, and the best choice depends on how often returns happen and who’s likely to handle the box. The most common merchants pick one method and treat it as standard, but the better approach is to match the method to the return behavior. A bulky item, a repeat customer, and a no-printer household don’t need the same path.
Put the label in the box when convenience matters most
An included printed label is the simplest path for brick-and-mortar sellers and higher-value ecommerce brands that already ship a packing slip. The label rides inside the package, so the customer doesn’t need to log back in, download anything, or wait for an email. That convenience comes with a trade-off, if the label is never used, it still has to be accounted for inside your returns workflow.
Send the label by email when flexibility matters
Emailing a PDF label is usually the lowest-friction digital option for ecommerce. It’s easy to attach to the RMA confirmation, easy to resend if the customer misplaces it, and easy to pair with instructions. For merchants, it also keeps the outbound box cleaner and gives support teams a simple reissue path.
Use QR code or Label Broker style redemption when the customer has no printer
USPS also supports a printerless path through QR-code or Label Broker style redemption at the Post Office. That removes one of the biggest household blockers, no printer. The clerk prints the label at the counter, which makes this route useful when the customer is traveling, the item was bought online, or the return needs to be handled quickly without home equipment.
A good return path removes friction without creating extra support calls. The best one is the one your customer can actually use on the day they’re ready to send the item back.
USPS says merchants can generate return labels through merchant tools, and consumers can then mail the parcel by visiting a Post Office, using a collection box when eligible, or scheduling package pickup. Those options matter because label delivery and parcel handoff are two different decisions, and both have to work for the return to move.
Printing the Return Label Correctly Every Time
Printing problems usually show up at the counter, not on the desk. The label looks fine in the PDF, then the barcode blurs, the image scales wrong, or the tape catches the edge and creates a wrinkle right across the scan area. If you want the label to work on the first pass, the printer settings have to match the label format.
Use the right output settings before you hit print
A clean USPS return label should print at 300 DPI or better, at true size, with no “fit to page” scaling. The address and barcode need to sit flat and remain readable, and the label should be printed on white or light-colored stock so contrast stays sharp. Inkjet, laser, and thermal all work, but each one behaves differently with adhesive stock and glossy surfaces.
| Setting | Requirement | Common Failure |
|---|---|---|
| Resolution | 300 DPI minimum | Blurry barcode or thin text |
| Scaling | True size, no fit to page | Barcode shrinks below readable size |
| Orientation | Address and barcode face up | Upside-down or rotated output |
| Stock color | White or light-colored | Low contrast and weak scans |
| Output type | Thermal, inkjet, or laser | Smearing on the wrong stock |
Thermal printers are strong for high-volume teams because they skip ink, while inkjet and laser are fine for occasional use if the paper stays flat. Smearing is the usual issue with inkjet on the wrong surface, so don’t treat every sheet like a standard office memo. For a practical printing walk-through, this small-business label printing guide is a helpful reference.
No printer doesn’t have to mean no return
If the customer can’t print, the no-printer path still works. USPS-supported redemption through a QR code or Label Broker style presentation lets the clerk pull the label at the counter, and APPS-mailed or emailed label requests can still get a return into motion without a home printer. Click-N-Ship Print and Ship labels are for domestic addresses, so don’t assume that every return format will fit every destination or delay tolerance.
The best outcome is simple, label output that matches the handoff method. If the customer plans to stand at a counter, a clean barcode image matters more than fancy design.
Choosing Where the Package Actually Gets Mailed
The label only solves half the problem. The other half is where the parcel physically enters USPS’s network, and that choice should depend on size, value, and whether you need an acceptance scan. I’ve seen customers save time and avoid a second trip by picking the right handoff method before they leave home.
Counter service gives the cleanest proof of acceptance
A Post Office counter drop-off handles every size, and it’s the best choice when the shipper wants a live acceptance scan or needs the clerk to handle a return receipt or insurance scan at the same time. The downside is the line, which can vary by location. For many customers, the wait is worth it because they walk out with a receipt that proves the item entered the mail stream.
Blue collection boxes are for simple prepaid returns only
Blue collection boxes are useful for prepaid returns under one cubic foot when the customer doesn’t need a counter scan. They’re convenient, but they don’t provide the same acceptance evidence as a staffed drop-off. That makes them a better fit for lower-friction returns where the merchant is comfortable relying on tracking instead of an in-person receipt.
Scheduled pickup fits the package that shouldn’t be carried around
USPS package pickup is the most practical option when the box is awkward, the customer is busy, or the parcel is already sealed and ready to leave the house. USPS says pickup is available across 41,711 ZIP Codes, and the network includes 31,324 Post Offices and more than 143,000 collection boxes, which gives domestic shippers multiple ways to get a return moving, according to the USPS postal bulletin on return services.
| Drop-Off Method | Best For | Size Limit | Acceptance Scan |
|---|---|---|---|
| Post Office counter | High-value items, scan proof, full service | Every size USPS accepts | Yes |
| Blue collection box | Small prepaid returns, simple handoff | Under one cubic foot | No |
| Scheduled pickup | Bulky parcels, time-saving returns | Depends on service and route | Carrier pickup confirmation |
For a local example of how drop-off choices can be matched to a route and schedule, the Sugar Land USPS drop-off guide is a useful planning aid.
If the parcel is large, awkward, or valuable, the counter usually saves more trouble than it costs. If it’s small and prepaid, the box may be enough.
Handling Expired Labels, Refunds, and Reuse Edge Cases
Expired labels are where return workflows get messy. The label may have been created on time, but the customer delayed the drop-off, the item was repacked, or the return sat on a shelf while the merchant sorted out the order. Those edge cases are manageable, but only if the team knows what USPS will and won’t honor.
Unused labels and late returns are not the same thing
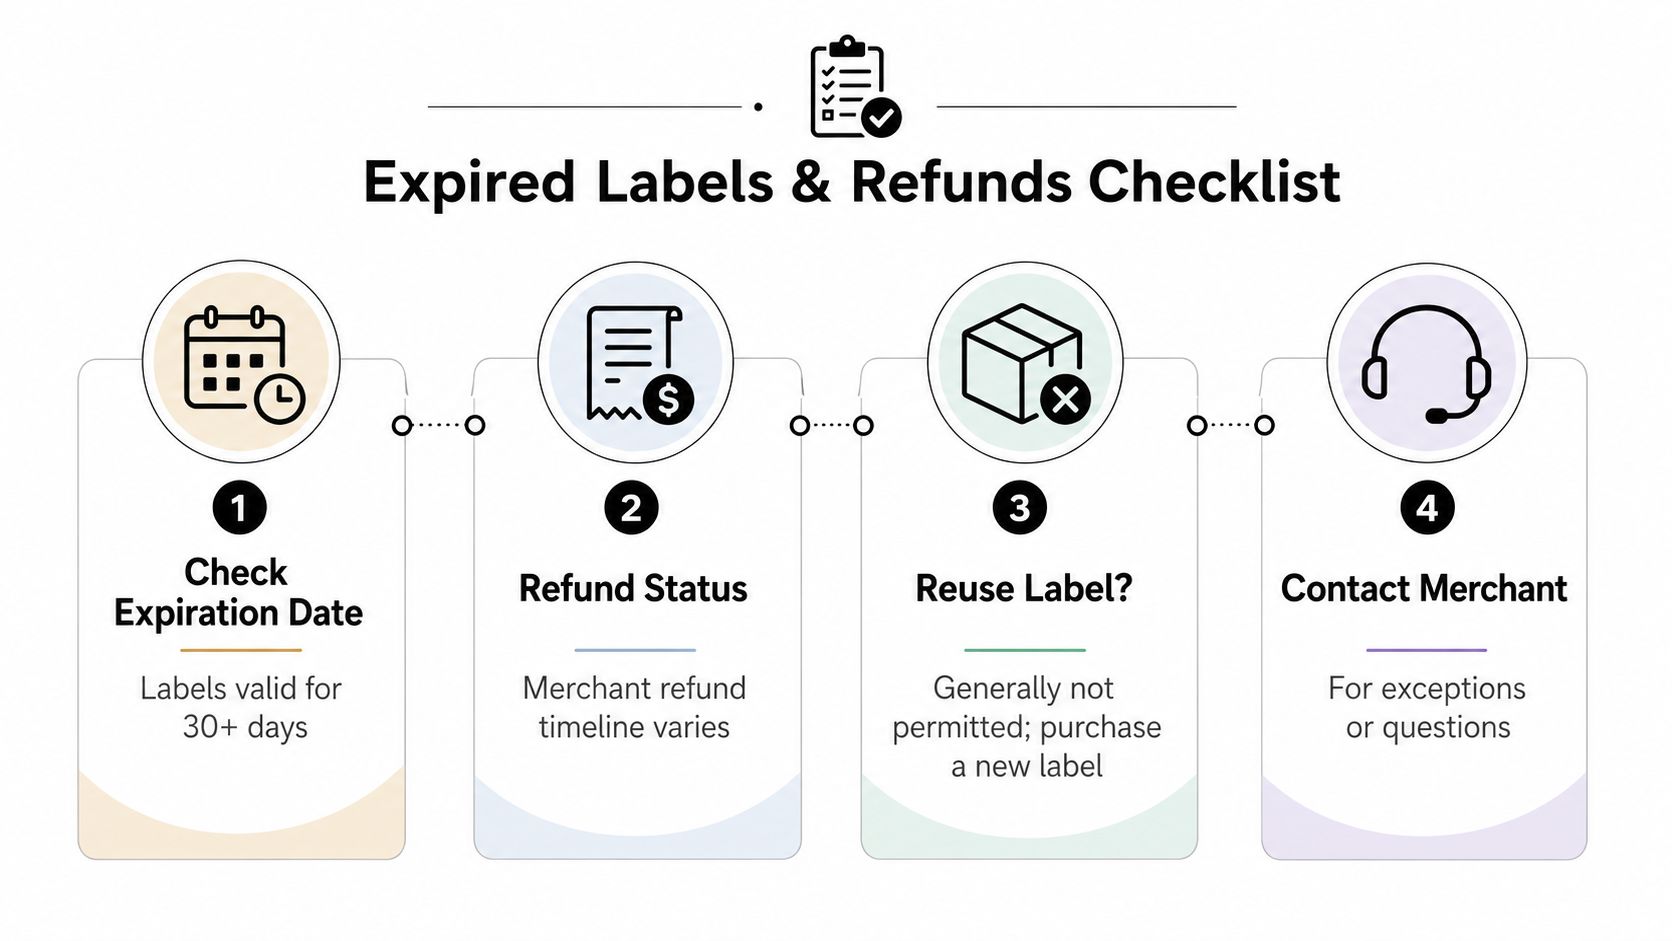
USPS says business shippers can generate return labels, that the label is free until used, and that the shipper is charged only after the recipient uses it. USPS also says return labels must be used within 30 days of the outbound ship date, so the label’s usefulness and the billing event aren’t identical. If the return is never scanned, it shouldn’t behave like a completed shipment.
Reuse is narrower than most customers think
A label can’t just be peeled off and treated like a fresh shipment. If the box was opened, the item was repacked, or the service details changed, the safer move is to void the old label and create a new one. That’s especially true if the weight, destination, or service class no longer matches the original setup.
Reusing a label is only defensible when the service class, weight, and destination still line up exactly. Once those variables change, the old barcode is no longer the right operational choice. A new label is boring, but boring is what USPS processes best.
Refunds follow the unused label path
When a label expires unused, the merchant’s refund process depends on the platform and the internal billing cycle. USPS-facing content does not present a single customer-friendly rule set for every return product type, so merchants need their own support script ready before customers ask. The cleanest answer is to explain whether the label was ever scanned, whether the return window is still open, and whether a new label needs to be issued.
Pre-Shipment Checklist for a Clean USPS Return
Before the box leaves the counter or the porch, run the shipment like a final quality check. That’s the difference between a return that disappears into USPS tracking and one that comes back with a routing problem or a missed acceptance scan. The last minute is where most label mistakes can still be fixed.
Verify the label before you seal the package
- Match the return address: Make sure the return-to information matches the merchant instructions and the customer’s RMA.
- Check the barcode placement: Keep the Intelligent Mail barcode flat, uncovered, and away from seams or tape edges.
- Confirm the label is still valid: The return should still fit inside the 30-day window tied to the outbound shipment.
- Remove old markings: Cover or remove previous shipping labels so the parcel doesn’t get misrouted.
- Save the receipt: Keep the acceptance receipt or scan confirmation as proof the package entered the mail stream.
The label also has to match the service level that was chosen at creation. If the parcel no longer fits the original class, the safest move is to void and reissue instead of forcing the old label to do a new job. That’s especially relevant when a shipment started as one service and later got repacked into something heavier or larger.
Pick the drop-off path before you leave home
The handoff choice should match the parcel, not just the calendar. A counter drop-off gives the cleanest receipt, a collection box works for simple prepaid returns, and pickup is the easiest option when the box is bulky or the sender can’t travel.
For merchants, a good home base for packing, shipping, and supply planning is helpful too, especially when the same team handles returns, outbound orders, and office supplies. The shipping supplies near me guide is a useful local reference when you need to restock labels, tape, mailers, or packing materials.
The goal is a clean handoff, not just a printed sticker. Once the label is flat, readable, and tied to the right return path, USPS has a much easier time moving the parcel through the network.
If you need help handling returns, packing fragile items, or choosing the right USPS drop-off path in Sugar Land, visit Business Mail Boutique LLC. The team can help with USPS returns processing, professional packing, and shipping support so your return label gets from the counter to the mail stream without avoidable delays.

Related posts

Custom Memorial Glasses Engraved in Three Hours in Sugar Land
When a customer needed eight personalized glasses for a memorial, Business Mail Boutique completed the engraving or...

Custom Martini Glass Engraving in Sugar Land, TX
Custom Logo Engraving on Martini Glasses in Sugar Land, Texas.
Business Mail Boutique recently completed a beautiful custom engravin...

Custom Engraved Wine Glasses for a Golf Club Event in Sugar Land, TX
Custom Engraved Wine Glasses for a Golf Club Event in Sugar Land.
Custom wine glass engraving in Sugar Land, TX at Business Mail Bouti...