
- Print Business Cards in Sugar Land – Same Day Service
- Copying Services
- Document Printing, Finishing & Lamination in Sugar Land
- Flyers
- Print Banner in Sugar Land | Same-Day Banner Printing Near Me
- Graphic Design
- Photo Printing
- Postcard Printing
- Document Printing
- EDDM Full Service Postcards
- FotoZoomer Large Format Printing


Print Open House Signs for Real Estate
Discover the best open house signs real estate strategies. Learn to design, place, and order effective signs to drive traffic & boost sales in 2026.
Businessmailboutique
11645 S. Hwy 6
Sugar land, Texas 77498 United States (US)
Email: info@businessmailboutique.com
Route
You’ve got an open house on the calendar, the listing just went live, and the sign situation is still a mess. One arrow board is faded. A stake is bent. The branded panel you used last month still has the wrong phone number. And if you’re in a market like Sugar Land or greater Houston, you also have to worry about whether the spot you usually use is even allowed.
That’s the practical application of open house signs in real estate. It isn’t a design exercise in a vacuum. It’s a speed, visibility, compliance, and budget problem all at once.
Most agents don’t need more abstract branding advice. They need signs that can be produced fast, read from a moving car, placed without getting removed, and stored well enough to use again next weekend. That’s where a practical system beats a pretty mockup every time.
The True Purpose of Your Open House Signs
A lot of agents still judge signs by one question: did the sign sell the house?
That’s too narrow. The actual job of open house signs in real estate is to create visibility, guide people to the property, and reinforce that the listing is being marketed professionally. A sign can do its job even when it doesn’t directly produce the buyer.
The data supports that view. According to the National Association of Realtors, 4% of buyers found the home they purchased through a yard sign, while 5% of buyers found their future agent through that signage, as summarized in this review of NAR open house findings. That’s why experienced agents treat signs as a repeat-use marketing asset, not a one-weekend expense.
Signs do three jobs at once
First, they direct traffic. Buyers who are already en route need reassurance at every turn that they’re still going the right way.
Second, they signal professionalism. A clean, readable sign package tells visitors that the same care probably carries into the listing presentation, the marketing plan, and the transaction.
Third, they advertise the agent to the neighborhood. Sellers notice who shows up prepared.
Practical rule: If your signs are only built for one listing, you’ll keep overspending. Build a reusable sign system around your brand, then swap riders or inserts for each property.
That shift matters. Once you stop expecting a sign to single-handedly close a sale, your decisions improve. You start asking better questions: Is the arrow obvious? Is the phone number current? Can this panel be reused? Can I get replacements fast if the weather turns or the schedule changes?
What works better than hope
Busy agents need a simple standard:
- Brand first: Keep your brokerage and agent identity consistent.
- Direction second: Make every turn unmistakable.
- Property detail third: Add only what supports quick action.
If you’re pairing physical signs with a broader open-house plan, these game-changing open house tactics are worth reviewing because they line up with what signs do best: attract attention, support the event, and create follow-up opportunities.
Designing Signs That Actually Get Noticed
The best sign isn’t the one with the most information. It’s the one a driver can understand fast.
That changes everything about design. You’re not creating a brochure. You’re creating a roadside instruction.
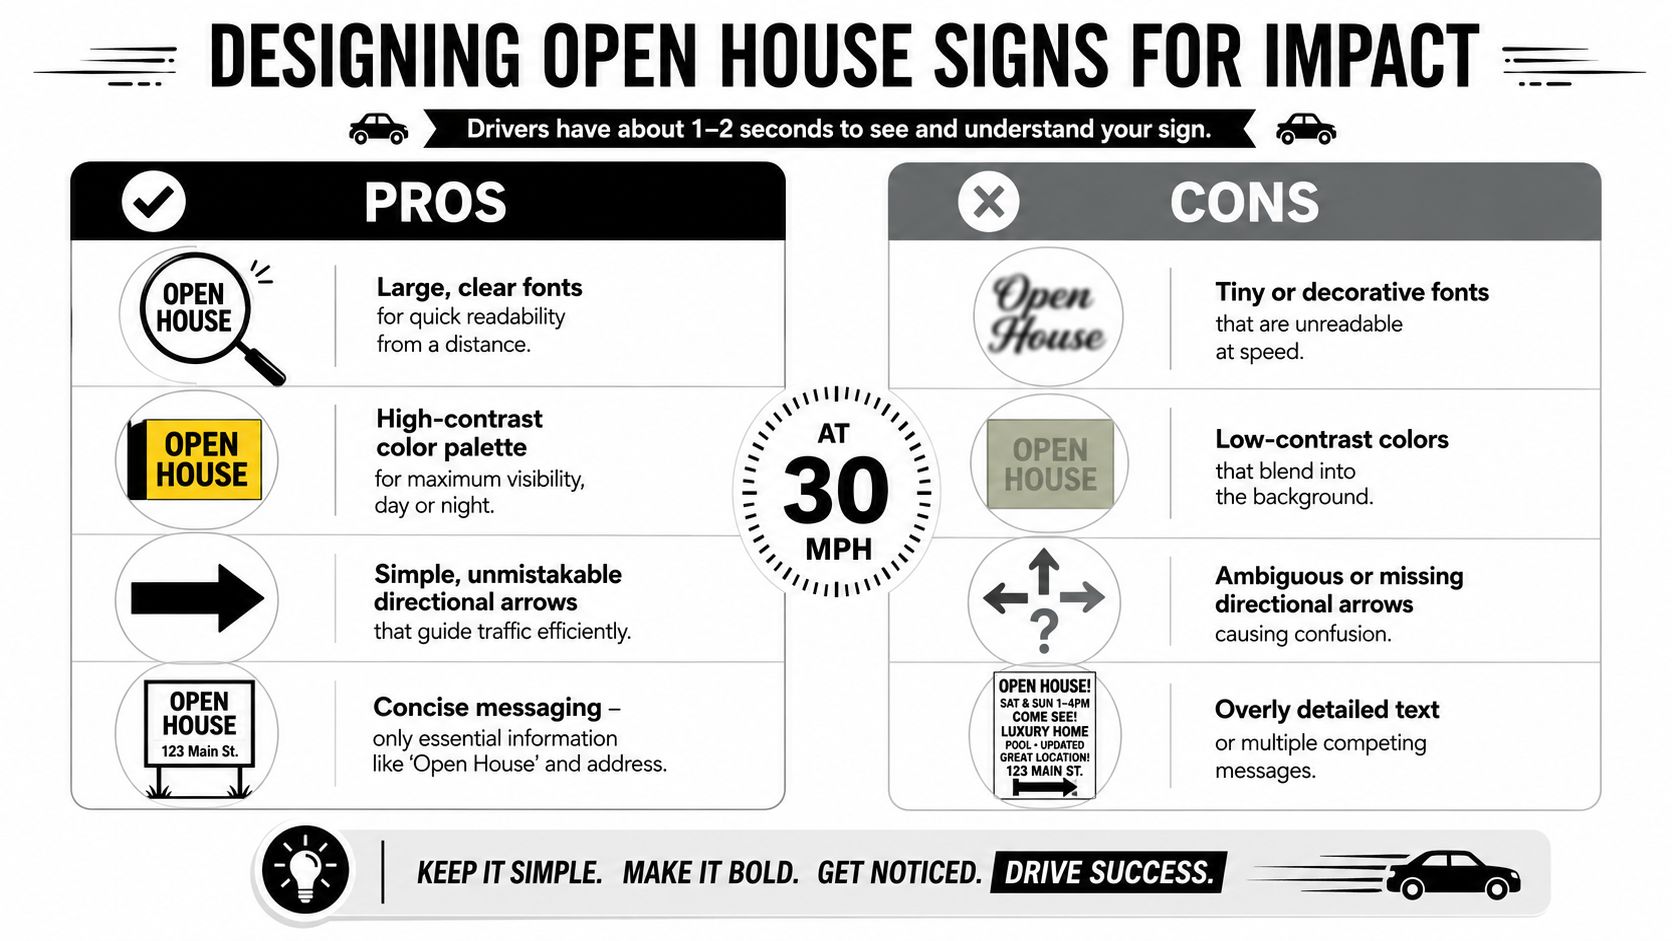
Think like a driver, not a designer
A strong open house sign uses large type, high contrast, and a single visual priority. The eye should land on “Open House” first, then the arrow, then your branding. Anything else is optional.
Weak signs usually fail in familiar ways:
- Tiny text: It may look refined on screen, but it disappears outdoors.
- Low contrast: Beige on white, gray on navy, or pastel on pastel gets lost.
- Too many messages: “Open House,” date, time, QR code, headshot, logo, slogan, website, phone number, awards badge, and feature list all on one board is too much.
- Confusing arrows: If a driver has to slow down to interpret the sign, the sign has already failed.
A good sign gives one instruction at a glance. A bad sign asks the viewer to read.
Use plain sans-serif fonts. Use bold arrows. Keep backgrounds clean. If you want a luxury feel, get it through spacing, color discipline, and material quality, not decorative script.
What belongs on the sign
For most directional signs, the essentials are short:
- Open House: Make this the biggest text.
- Arrow: Large, dark, and impossible to miss.
- Agent or team branding: Enough to build recognition.
- Contact detail if space allows: Only if it doesn’t reduce readability.
For the main property sign at the listing, you can include more. That’s where a rider, QR code, or event time can make sense. But your directional boards should stay stripped down.
A practical way to think about hierarchy:
- Message
- Direction
- Brand
- Everything else
If item four starts crowding item one, cut item four.
For lightweight indoor or covered-use displays, an easel back sign option can work well at the front entry, sign-in table, or check-in station. It’s not a replacement for outdoor directionals, but it can sharpen presentation inside the property.
Sign formats compared
Different sign styles do different jobs. Don’t force one format to handle all of them.
| Format | Best use | Pros | Cons | Budget fit |
|---|---|---|---|---|
| Corrugated yard sign | Directional route signs | Lightweight, easy to stake, affordable, simple to reorder | Less premium feel, can bend or fade with heavy reuse | Best for tight budgets |
| A-frame sign | Main property frontage, sidewalks, entrance points | Stable, professional, reusable frame | Bulkier to store and transport | Good long-term value |
| Rider panel | Adding event details to an existing sign | Flexible, easy to swap by listing | Limited space | Very efficient |
| Foam board display | Indoor branding or property info display | Clean presentation, strong print quality | Not ideal for exposed weather | Best for interior use |
| Feather flag | High-visibility frontage | Visible from farther away, strong presence | Not right for every neighborhood or HOA | Selective use |
A smart package usually combines them. Use corrugated directional signs to build the route. Use an A-frame or stronger main sign at the listing. Add riders only where they help.
Choosing Your Signage Materials and Production
Material choice matters because open house signs in real estate get handled hard. They ride in trunks, lean against garage walls, sit in wet grass, and get reused before they’re fully cleaned from the last event. The wrong material looks tired fast.
Build the sign kit around the job
Start with the route, not the catalog.
If a sign needs to sit at a turn for a few hours, corrugated plastic usually makes the most sense. It’s light, practical, and easy to move in batches. If a sign will anchor the property entrance and represent your brand up close, a sturdier format often earns the spend because it holds up better and looks more polished.
Indoor displays are a separate category. They don’t need weather resistance. They need crisp print and clean presentation. That’s where foam board and tabletop pieces are useful, especially for feature sheets, financing info, or “please remove shoes” messaging near the door. If you need help deciding when that format makes sense, this foam board print guide for signs, photos, and displays gives a practical overview.
Open House Sign Material Comparison
| Sign Type | Best For | Avg. Cost | Pros | Cons |
|---|---|---|---|---|
| Corrugated plastic yard sign | Directional placement outdoors | Varies by size, print method, and quantity | Lightweight, weather-friendly, easy to stake, reusable | Can crease, fade, or look basic |
| Metal A-frame with insert | Front-of-property presence | Higher upfront investment | Durable frame, professional appearance, easy panel swaps | Bulkier and heavier |
| Foam board sign | Indoor displays and entry messaging | Moderate for short-run prints | Clean surface, sharp color, polished look | Not built for rain or rough handling |
| Banner | Fence line or frontage where allowed | Varies by size and finishing | High visibility, reusable, large message area | Needs proper mounting and legal placement |
| Feather flag | High-visibility frontage | Higher than basic yard signs | Motion and height increase noticeability | Not suitable in every community |
The “Avg. Cost” column stays broad on purpose because actual pricing changes by size, substrate, finish, and turnaround. What matters is choosing the right material for the job so you don’t keep replacing avoidable failures.
How to handle rush production without chaos
Rush orders usually go wrong for one reason. The agent sends incomplete specs.
When you need same-day or next-day production, provide the printer with a clean brief:
- Size: State the exact dimensions you want.
- Quantity: Separate route signs from main property signs.
- Sides: Single-sided or double-sided.
- Finish: Grommets, stakes, riders, or stand compatibility.
- File status: Print-ready art or design help needed.
- Pickup deadline: Give the precise deadline, not a vague “ASAP.”
Shop-floor reality: Same-day printing works best when the design is already stripped down, approved, and sized correctly. Complexity kills speed.
The agents who stay on budget usually do one more thing right. They standardize the base sign and only change the listing-specific pieces. That reduces setup time, reduces errors, and makes reordering much simpler when a weekend opens up suddenly.
A Strategic Guide to Sign Placement
Most sign plans fail before the first stake hits the ground. Not because the signs look bad, but because the route makes no sense.
Placement should feel like a breadcrumb trail. A buyer should be able to follow it without guessing, turning around, or second-guessing whether they missed the street.
Start with this visual process.
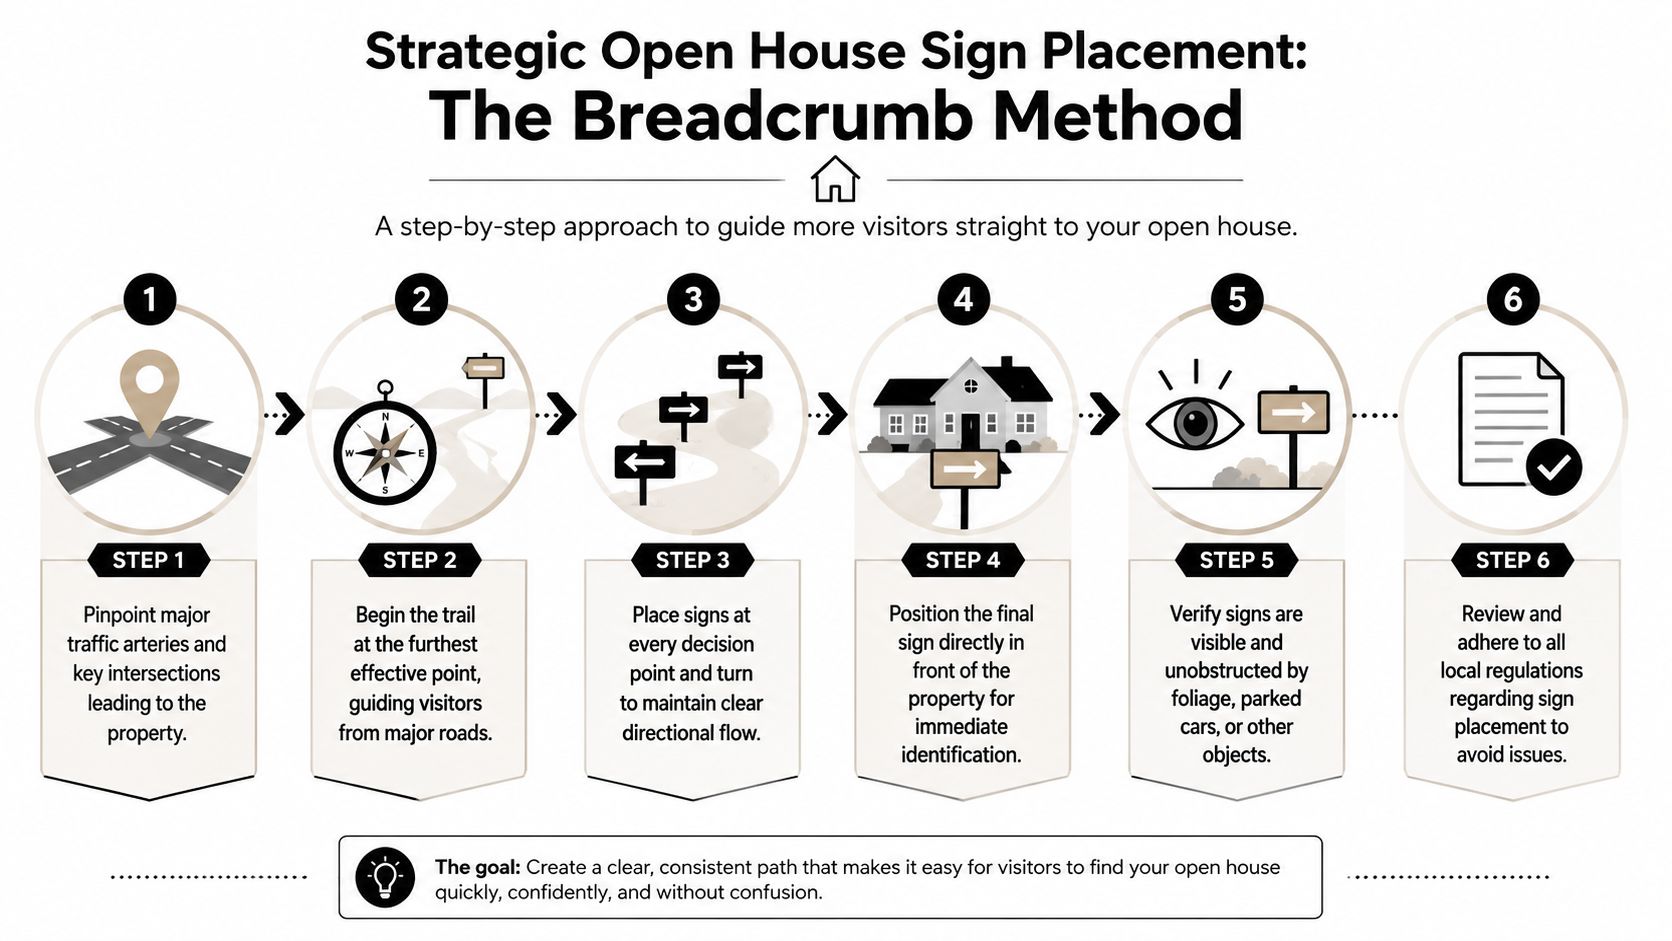
Build a breadcrumb trail, not a random scatter
Industry recommendations often call for 20 to 25 directional signs in high-traffic areas so buyers don’t miss a turn, according to this open house analysis. That number surprises newer agents, but it makes sense once you map the route properly.
Use this order:
- Start at the farthest meaningful entry point. That’s usually the main road or neighborhood entrance where a driver first needs confirmation.
- Mark every decision point. Every turn gets a sign. No exceptions.
- Reassure after the turn. One sign at the corner helps. One shortly after the turn confirms they made the right move.
- Own the last stretch. As visitors get close, signs should tighten up so nobody drifts past the property.
- Finish with a clear property marker. The home itself should be unmistakable.
This short video captures the field mindset well when you’re planning route visibility and setup rhythm:
Where most placement plans fail
Three mistakes show up over and over.
- Too few signs: The route works in your head because you already know it. Visitors don’t.
- Bad sight lines: A sign hidden behind a parked truck, hedge, utility box, or school banner might as well not exist.
- Late setup: If signs go out too close to start time, you lose early traffic and add stress to your own morning.
Walk or drive the route before event day if the neighborhood is unfamiliar. Check where cars pause, where eyes naturally land, and which corners need a larger sign or stronger arrow.
Signs should be visible before the decision point, not after it.
If you want a wider playbook around route planning, event promotion, and listing exposure, these real estate marketing strategies are useful because they treat signs as one channel inside a broader system.
Check legality before you plant a single stake
This part isn’t optional paperwork. It’s risk control.
A sign in the wrong strip of grass, median, or subdivision entrance can disappear before your first guest arrives. Worse, repeated violations can create friction with HOAs, code officers, and neighborhood managers who will remember your name next time.
In Texas-area suburbs, that matters more than many agents expect. The fastest route isn’t always the legal route. A slightly less visible placement that stays up is worth more than the “perfect” corner that gets removed.
Navigating Local Sign Rules and Regulations
Compliance is where a lot of open house sign advice gets lazy. Agents hear “put signs at major intersections” and stop there. But intersections can fall under city rules, county rules, private property rules, or HOA rules. Those are not the same thing.
The practical issue is simple. If you don’t verify placement, you risk losing the signs and the money attached to them. In markets like Houston, that risk is not theoretical. In many US markets, agents face significant liability exposure, and in Houston over 30% of temporary yard signs are removed by code enforcement within 24 hours due to permit violations or improper placement, according to this review of sign placement risks.
What to verify before event day
Check four buckets before you map your route:
- City code: Ask about temporary sign placement, medians, right-of-way restrictions, and time limits.
- HOA rules: Many neighborhoods control sign size, quantity, and approved locations.
- Brokerage compliance: Some offices have stricter branding and placement requirements than the city does.
- Property-owner permission: If you want a sign on a corner lot or private frontage that isn’t your listing, get permission.
Keep a simple compliance note in your phone for each farm area or subdivision you work often. Once you’ve verified a neighborhood, you won’t have to reinvent the process every weekend.
The cheapest sign is the one you can reuse. The second-cheapest is the one that doesn’t get confiscated.
Protect the budget by extending sign life
Regulation and budgeting connect more than most agents realize. If you know where you can legally place signs, you stop wasting inventory. If you clean, stack, and label them properly after each event, you stop rebuying basics you already own.
A durable system looks like this:
- Clean after pickup: Wipe dirt and moisture before storage.
- Sort by type: Keep arrows, branded fronts, riders, and stakes together.
- Label the stack: Mark sets by route or neighborhood if you work repeat areas.
- Retire damaged pieces early: One warped or faded sign can drag down the whole presentation.
That’s how you stretch a signage budget without looking cheap.
Your Quick-Action Toolkit and Checklist
The agents who stay calm on open-house day don’t wing the sign setup. They run a repeatable checklist.
That’s especially important when the event was scheduled fast, the weather shifted, or a last-minute print job landed on Friday afternoon. A simple field system keeps mistakes from compounding.
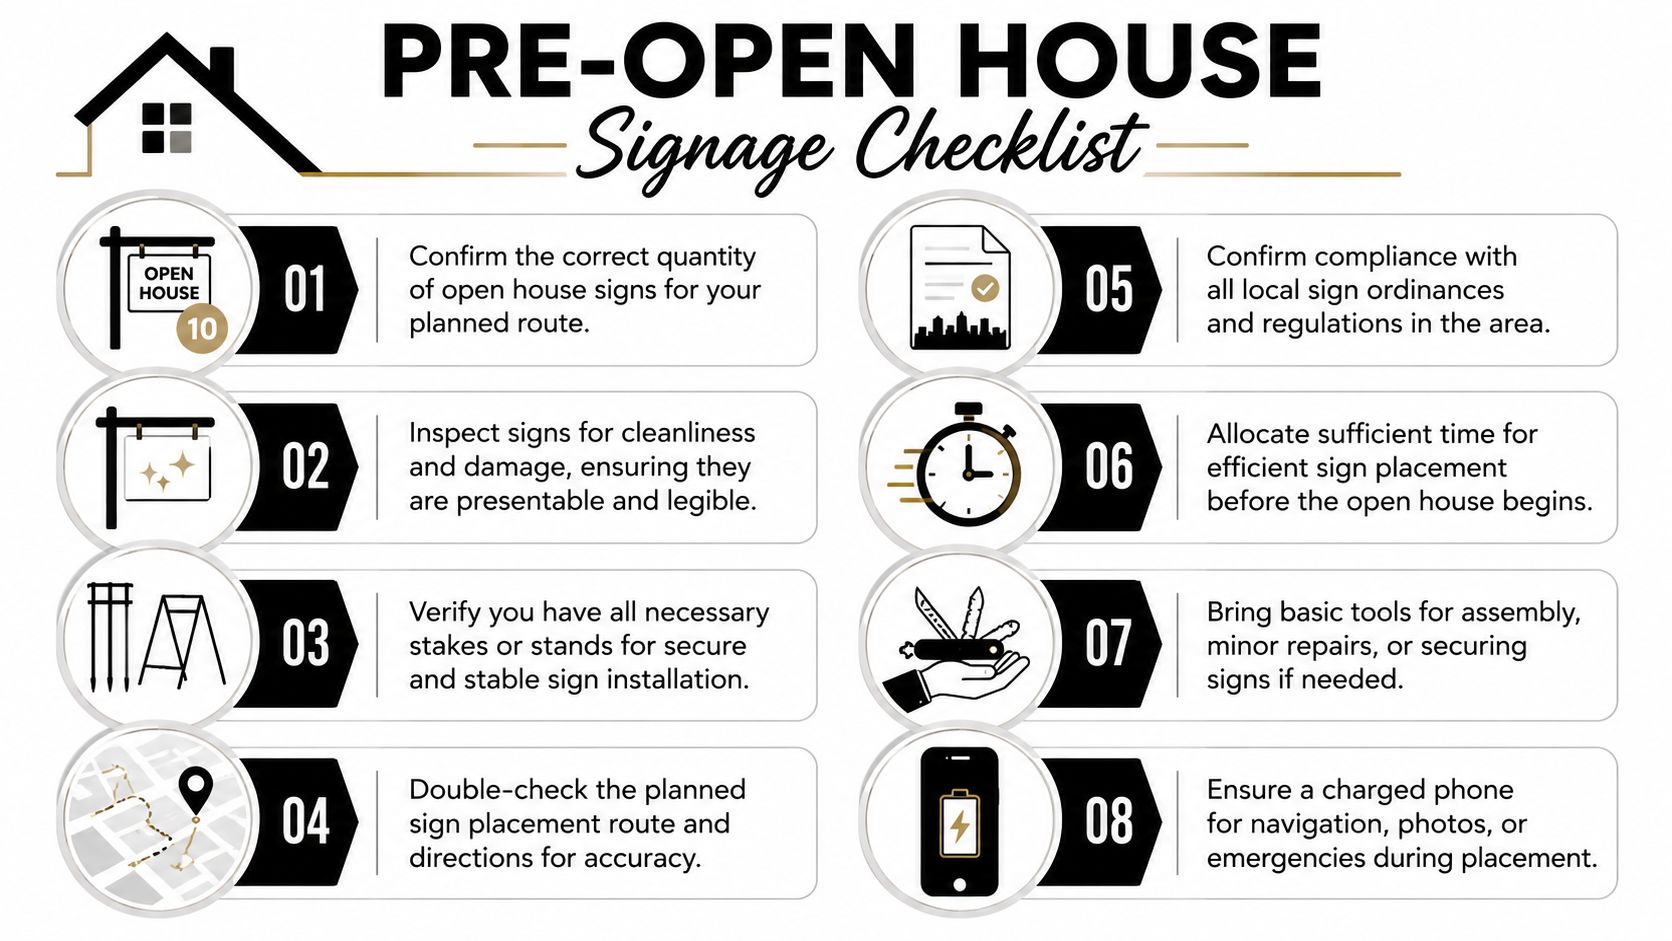
Pre-open-house signage checklist
Use this before every event, even if the listing is in a neighborhood you know well.
- Confirm quantity: Count route signs, main property signs, riders, and backup pieces.
- Inspect condition: Remove anything faded, cracked, dirty, or bent.
- Match hardware: Make sure the right stakes, frames, or stands are packed with the right signs.
- Review the route: Verify turns, entrances, and any roadwork or detours.
- Check local rules: Reconfirm HOA or municipal restrictions if the area is strict.
- Allow setup time: Don’t schedule yourself so tightly that signs go out late.
- Pack tools: Tape, zip ties, marker, wipes, and a basic cutter solve most field problems.
- Charge your phone: You’ll need it for maps, photos, and quick updates.
For agents handling a rush weekend, a local same-day yard sign printing option in Sugar Land can help close the gap when inventory is missing or a panel needs to be replaced fast.
Copy-and-paste order templates for rush printing
A print shop can move quickly when the order is clear. These templates save time.
Template for directional signs
- Product: Open house directional yard signs
- Quantity: [insert quantity]
- Size: [insert size]
- Print: [single-sided or double-sided]
- Material: Corrugated plastic
- Message: OPEN HOUSE
- Arrow direction: [left / right / straight, or mixed set]
- Branding: [agent name / team name / brokerage logo]
- Hardware needed: [stakes yes/no]
- Deadline: [pickup date and time]
Template for main property sign
- Product: Open house front-yard sign or A-frame insert
- Quantity: [insert quantity]
- Size: [insert size]
- Print: [single-sided or double-sided]
- Material: [insert material]
- Message: OPEN HOUSE
- Secondary text: [address, time, QR code, contact]
- Branding: [agent name / team / logo]
- Hardware needed: [frame / stand / grommets]
- Deadline: [pickup date and time]
Template for rider panel
- Product: Sign rider
- Quantity: [insert quantity]
- Size: [insert size]
- Message: [Today 1 to 4, Just Listed, Price Improved, etc.]
- Color: [brand colors]
- Mounting: [compatible with existing sign frame]
- Deadline: [pickup date and time]
Bring the old sign photo with you if you need a matching reprint. It cuts down back-and-forth and helps the printer match layout and color more closely.
Storage and reuse habits that save money
Sign budgets get wrecked by tiny avoidable problems. Wet boards thrown into a trunk. Riders separated from frames. Dirty panels stacked face-to-face. Hardware tossed in a box with no labels.
A better routine is simple:
- Store signs flat when possible: It reduces warping.
- Keep hardware in a dedicated tote: Don’t mix sign stakes with random event supplies.
- Use painter’s tape labels: Mark sets by listing type, route pattern, or neighborhood.
- Photograph your route: If a placement pattern worked well, save it for next time.
- Refresh branding in batches: Don’t wait until every piece looks tired. Replace the weakest pieces first.
The point isn’t perfection. It’s repeatability. Good open house signs in real estate should be easy to reorder, easy to place, and easy to reuse. If your current system creates friction every weekend, simplify the design, standardize the materials, and tighten your storage process.
If you need fast, practical help with open house signs, branded riders, rush yard sign printing, or other real-estate print materials, Business Mail Boutique LLC offers one-stop support in Sugar Land for same-day printing, signage, and related business services. When your weekend timeline gets tight, having a local shop that can handle printing, finishing, and pickup in one place makes the process a lot easier.

Related posts

Custom Memorial Glasses Engraved in Three Hours in Sugar Land
When a customer needed eight personalized glasses for a memorial, Business Mail Boutique completed the engraving or...

Custom Martini Glass Engraving in Sugar Land, TX
Custom Logo Engraving on Martini Glasses in Sugar Land, Texas.
Business Mail Boutique recently completed a beautiful custom engravin...

Custom Engraved Wine Glasses for a Golf Club Event in Sugar Land, TX
Custom Engraved Wine Glasses for a Golf Club Event in Sugar Land.
Custom wine glass engraving in Sugar Land, TX at Business Mail Bouti...