
- Print Business Cards in Sugar Land – Same Day Service
- Copying Services
- Document Printing, Finishing & Lamination in Sugar Land
- Flyers
- Print Banner in Sugar Land | Same-Day Banner Printing Near Me
- Graphic Design
- Photo Printing
- Postcard Printing
- Document Printing
- EDDM Full Service Postcards
- FotoZoomer Large Format Printing


Photo Collages: Design & Print.
Master professional photo collages with our FOTOZOOMER step-by-step guide. Discover templates, software tips, export specs, and expert printing advice.
Businessmailboutique
11645 S. Hwy 6
Sugar land, Texas 77498 United States (US)
Email: info@businessmailboutique.com
Route
You’ve probably got a folder full of photos, a deadline that’s closer than you’d like, and one practical question that most collage tutorials skip: how do you turn a good-looking digital layout into a printed piece that still looks sharp, holds up on display, and doesn’t waste money on reprints?
That gap shows up all the time with photo collages. A team builds something attractive in an app, sends it to a local printer, then runs into soft images, awkward cropping, edge problems, or a finish that doesn’t suit the space. Digital design is only half the job. Print success comes from making layout, file setup, material choice, and finishing decisions early, not after the order is placed.
For small businesses, schools, event organizers, and families creating display pieces, memorial boards, lobby décor, branded storyboards, or gift items, the most expensive mistake is treating print like an afterthought. A collage has more moving parts than a single-image poster. More crops. More edges. More chances for inconsistency. That also means more opportunities to make smart trade-offs.
Table of Contents
- Understanding the Photo Collage Printing Process
- Planning Your Photo Collage Layout Templates
- Designing a Photo Collage in Software and Apps
- Preparing Files for High Quality Photo Collage Prints
- Ordering Photo Collage Prints and Custom Gifts Locally
- Best Practices for Durable and Affordable Photo Collages
Understanding the Photo Collage Printing Process
A photo collage is not just a decorative grid. The term Fotocollage refers specifically to photographs arranged onto a supporting surface, which separates it from broader mixed-media collage work, as noted in the definition of Fotocollage. That print surface matters because every decision after layout has to support the final object, not just the screen preview.
Most printing problems start before anyone exports a file. A restaurant owner might need a wall display from staff photos. A realtor might want a closing-day collage for a client gift. A family might be preparing a memorial board. In each case, the workflow should begin with the final use. Wall display, framed keepsake, foam board sign, mounted lobby piece, and laminated event board all behave differently.
Know the stages before you design
The practical sequence is simple:
- Define the final size and display method
- Choose the layout based on photo shapes and quantity
- Build with bleed and safe margins in mind
- Export in a print-ready format
- Review a proof before production
- Add finishing such as lamination, mounting, or framing if needed
If you skip step one, everything downstream gets harder. A collage designed loosely for “something around poster size” usually creates avoidable cropping and scaling issues later.
Practical rule: Decide the physical size first. Then build the collage to that exact proportion.
Print terms that actually affect the result
A few terms matter more than the rest:
- Bleed: Extra image area beyond the trim edge so you don’t end up with white slivers after cutting.
- Safe zone: The inner area where faces, logos, and text should stay.
- Color profile: The color space used for output. Screen color and printed color don’t always match.
- Substrate: The material being printed on, such as photo paper, canvas, or mounted board.
Finish also changes perception. Matte, gloss, and textured stocks don’t just look different. They change glare, contrast, and how fingerprints show up. If you’re comparing options for art-style collages or framed displays, this guide to understanding textured print finish is a useful reference when choosing a surface that suits the room.
Planning Your Photo Collage Layout Templates
The fastest way to waste time is to open a design app before deciding what kind of collage you’re making. A layout that works for square Instagram shots often fails when you’re mixing phone portraits, wider-format team photos, scanned prints, and screenshots from different years.
Template choice should follow three things: photo count, dominant orientation, and viewing distance. If the collage will hang in a hallway, tiny images can work. If it’s for an event sign that people read from several feet away, fewer and larger images usually print better.
Match the template to the job
A collage for a graduation board needs a different structure than one for a retail wall or a real estate closing gift. For portrait-heavy sets, vertical cells reduce cropping. For travel or team recap pieces, a looser masonry arrangement handles mixed orientations better.
Here’s a practical comparison to use before you design.
| Template Name | Photo Count | Aspect Ratio |
|---|---|---|
| Classic Grid | Low to high | Best when the final print is square or rectangular with evenly cropped images |
| Masonry Layout | Medium to high | Works well for mixed portrait and landscape photos |
| Center Hero Layout | Low to medium | Best when one key image leads and supporting images fill the edges |
| Circular Collage | Low to medium | Suits decorative or gift-focused formats more than information-heavy displays |
| Filmstrip Style | Low | Strong for sequential storytelling and narrow horizontal prints |
What usually works and what doesn’t
Grid layouts are easy to build and easy to trim, but they can feel stiff if every image has the same weight.
Masonry layouts handle uneven image shapes better. They also hide quality differences more gracefully because each photo doesn’t need identical cropping.
Circular layouts look appealing on screen, but they’re harder to print efficiently if the final product is rectangular. You may end up paying for blank space or forcing awkward margins.
Symmetry feels safe, but safe isn’t always effective. If the collage has emotional or promotional value, a rigid arrangement can flatten the story.
A quick planning filter
Before choosing a template, answer these questions:
- How many photos deserve inclusion: More photos can dilute impact if several are weak or redundant.
- Which orientation dominates: A portrait-heavy set should not be forced into a horizontally-oriented grid.
- Will text appear in the collage: Quotes, dates, or captions need breathing room.
- Where will it be viewed: A lobby wall, easel display, and desktop gift each call for different image sizes.
When in doubt, start with a center-hero or masonry template. Both are more forgiving than a strict grid when your image set is inconsistent.
Designing a Photo Collage in Software and Apps
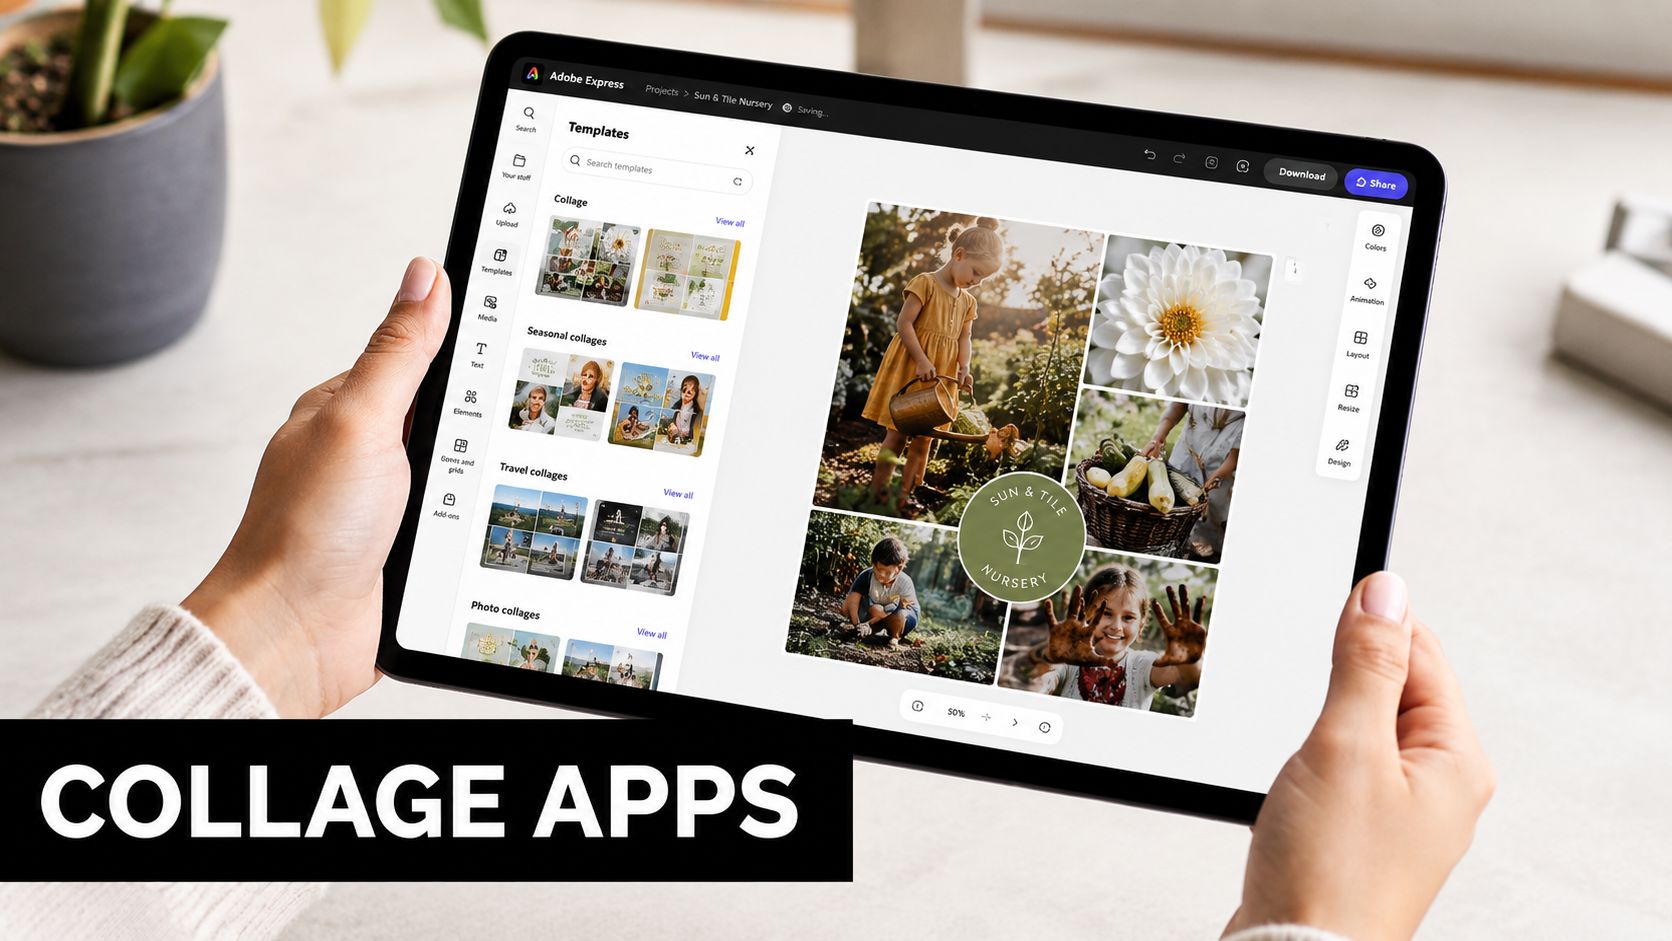
Assembling a collage is possible in almost any modern app. The difference comes from whether the software helps you control alignment, layering, and export cleanly enough for print. For quick jobs, Adobe Express and Canva are usually fine. For tighter control, desktop tools give you more reliable handling of guides, object locking, and precise placement.
Build the structure before styling
Start by creating the document at the final print proportion. Then place empty frames or shape containers before importing any photos. This keeps you from designing around random image sizes.
In Adobe Express, use layout blocks first, then replace placeholder images. In Canva, create or select a grid, then lock background elements so they don’t shift while you crop. In FotoZoomer workflows tied to print production, the key is staying disciplined with canvas size and image boundaries instead of freehand dragging until it “looks close enough.”
Three interface habits save a lot of cleanup:
- Lock guides early: This prevents accidental movement once spacing is approved.
- Use grouping for clusters: If several photos form one visual unit, group them before repositioning.
- Turn on snapping: It speeds up alignment and cuts down on tiny inconsistencies that become obvious in print.
Use depth carefully
A common mistake is making every image the same size with identical spacing. That’s clean, but it can feel lifeless. Adobe notes that asymmetrical layouts with intentional depth and overlapping elements increase viewer retention by 35% compared to grid-based symmetry in its collage guidance on Adobe Express. In practice, that means a collage often becomes more engaging when one image leads, a few overlap slightly, and the eye has a path to follow.
That doesn’t mean chaos works. Overlap is helpful when it creates hierarchy. It fails when it covers faces, cuts off meaningful details, or creates shadows and borders that compete with the photos.
If you want a strong visual reference for layered composition, it helps to shop this contemporary art print and study how image weight, spacing, and negative space work together in a finished piece. Even when your project is commercial rather than decorative, that kind of reference trains your eye.
Keep text and branding separate from crowded image zones
If a business wants to add a logo, event title, anniversary date, or short message, don’t float it into the busiest part of the layout. Reserve a quiet band, corner block, or bottom strip. Photo collages already carry a lot of visual information. Text needs separation to stay readable.
A practical software workflow looks like this:
- Place images and crop them.
- Establish the primary focal photo.
- Adjust spacing and overlap.
- Add background color or border treatment.
- Insert text last.
- Preview edges and safe areas before export.
Here’s a quick visual walkthrough for assembling a collage layout in an app environment:
What to watch during assembly
Keep checking the collage at reduced zoom. If the hierarchy disappears when the canvas gets smaller, the composition probably needs one stronger focal point.
Also check for repeated problems that software won’t fix for you:
- Mismatched white balance: One cool image beside a warm one can look unintentional.
- Uneven border thickness: Minor differences become noticeable in print.
- Faces near trim edges: They may survive on screen and fail after cutting.
- Overfiltered images: Heavy edits often print harsher than expected.
Good collage design isn’t about using every tool in the app. It’s about controlling enough variables that the printed piece feels deliberate.
Preparing Files for High Quality Photo Collage Prints
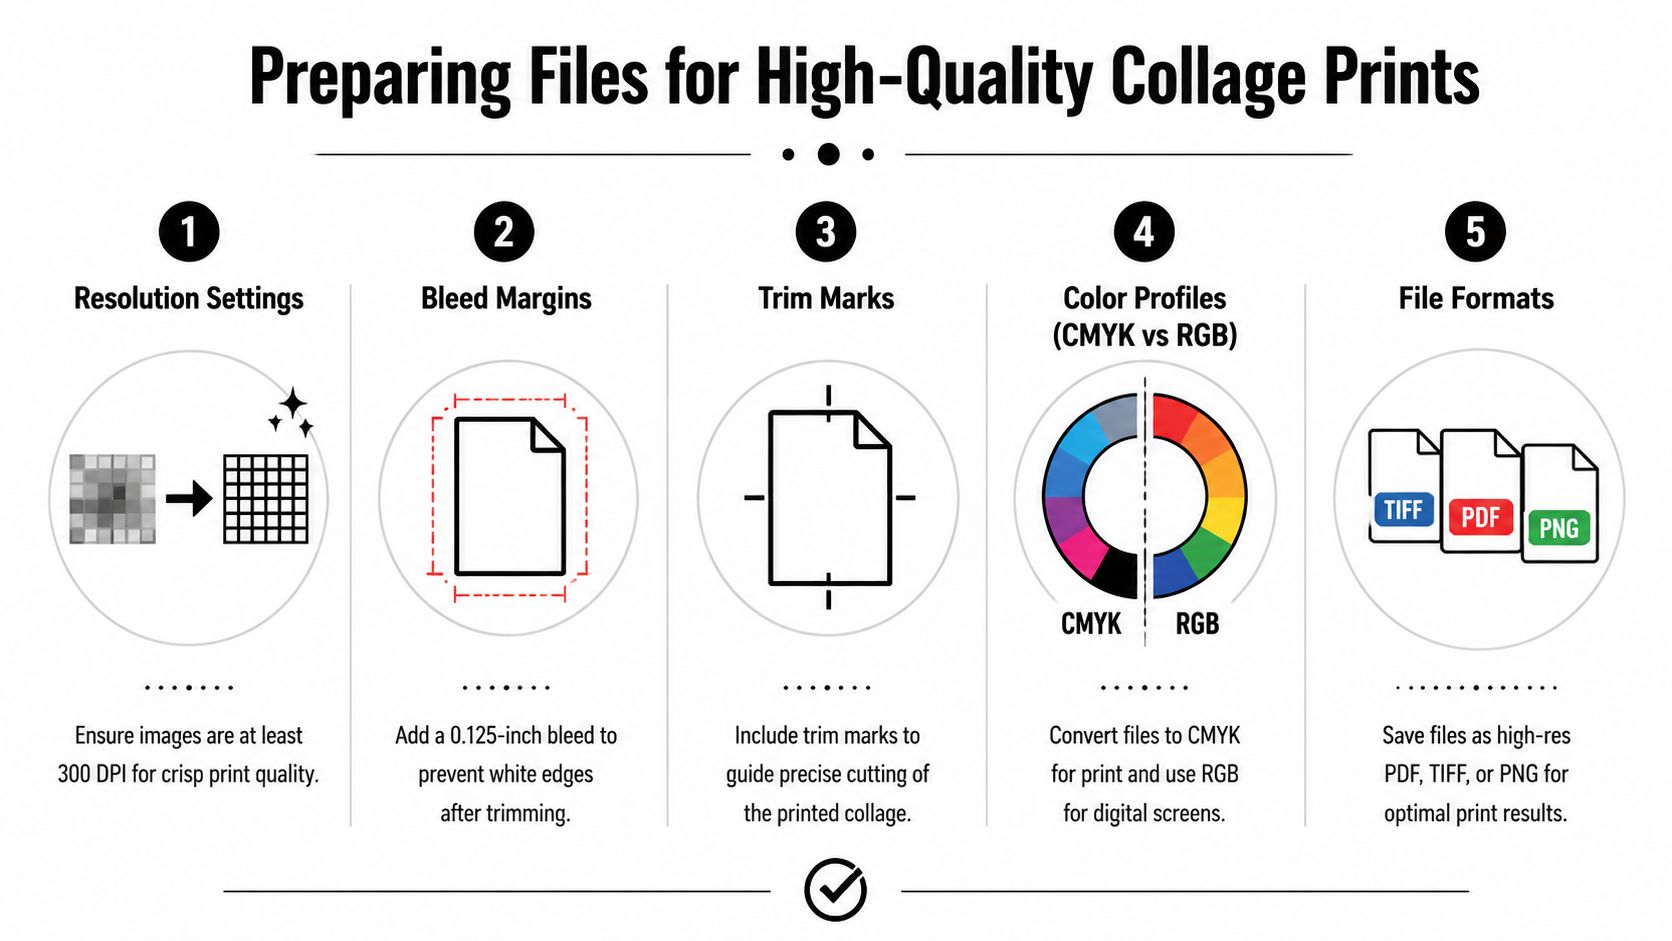
Export is where many good photo collages fall apart. The layout may be solid, but if the file is compressed badly, scaled carelessly, or saved in the wrong format, the print won’t reflect the design work.
Start with output intent
A mounted board, framed print, canvas wrap, and sublimated gift item may all begin with the same collage, but they don’t always need the same export approach. The safest habit is to ask the print provider what format they prefer, then build your export around that requirement instead of assuming one file suits everything.
For rigid displays and mounted presentation boards, material choice affects file prep as much as design does. This overview of foam board display printing considerations is useful if your collage will be mounted rather than framed.
The file settings that matter most
Use this checklist before sending anything to print:
- Canvas size: Match the final trim size exactly, plus bleed if required.
- Bleed area: Extend background colors and edge images past the trim line.
- Safe margin: Keep faces, logos, and text away from the outer edge.
- Format choice: PDF, TIFF, and PNG are common print-ready options depending on shop preference.
- Compression control: Avoid low-quality exports meant for email or social posting.
One technical issue deserves special attention. When smaller photos are enlarged to fit a larger print area, image quality can drop fast. Research on image-space collage optimization found that Lanczos interpolation preserves detail fidelity better, and that PNG exports can meet 20 MB file size limits when combined with optipng optimization according to the arXiv paper on collage optimization. That matters in real workflows because many creators upscale old or low-resolution images to fill template slots.
Practical export decisions
If your source images vary in quality, don’t enlarge every weak image just to fill the board. Reduce its visual importance instead. Smaller placement hides flaws better than aggressive scaling.
For local print submission, these habits usually work well:
- Name files clearly: Include project name, size, and version.
- Flatten only the final approved version: Keep an editable master until proofing is complete.
- Export one final print file: Don’t send multiple near-identical versions unless requested.
- Review at full size: Zoom into faces and fine details before delivery.
A soft image in one corner can drag down the whole collage. The viewer won’t judge each photo separately. They’ll judge the board as one object.
Common file-prep mistakes
Some errors show up repeatedly at the counter:
| Mistake | Result |
|---|---|
| Exporting from a social media preset | Loss of detail and compression artifacts |
| Forgetting bleed | White edges after trimming |
| Leaving text too close to the edge | Important content looks cramped or gets cut |
| Mixing random color edits | Uneven appearance across the collage |
| Sending screenshots instead of originals | Weak print quality |
The cleanest workflow is simple. Keep the master editable, export deliberately, and proof the exact file you intend to print.
Ordering Photo Collage Prints and Custom Gifts Locally
A local print order goes smoothly when the file is ready and the job is specified clearly. It slows down when the customer says “I just want it to look nice” and leaves the shop to guess the finish, mounting, and use case.
Start with the destination. A wall print for an office, an easel board for a memorial, and a mug or plaque gift each call for different production choices. The same collage can be adapted across products, but the print method and finishing should follow the object, not the other way around.
Choose the product before the finish
For larger display pieces, decide whether you need a flexible print, a mounted board, or a wrapped product like canvas. For gifts, think about where the collage will live. A desk plaque and a mug have different cropping constraints than a poster.
If you’re comparing options for standard photo output, enlargement, and finishing expectations, this guide to local photo printing service options gives a useful baseline for what to ask before placing the order.
What to tell the print shop
Shops can move faster when you provide practical details up front:
- Final size: Exact dimensions, not “roughly poster size”
- Use case: Indoor wall décor, event display, giveaway, or gift
- Finish preference: Matte, gloss, satin, or mounted
- Turnaround need: Standard timing or rush request
- File status: Final approved art or draft needing proof review
A good naming convention also helps. Use the project name and version, then keep revisions organized. “Team-Collage-Board-v3” is easier to process than “final-final-newest-use-this-one.”
Material trade-offs in plain terms
Matte surfaces reduce glare and usually suit collages with many images because reflections don’t compete with the details.
Gloss can add punch, but it also emphasizes fingerprints and overhead lighting.
Lamination helps when the collage will be handled often, displayed at events, or moved between locations. Mounting improves presentation and makes larger pieces easier to display without wrinkling.
If the collage is temporary, don’t overspend on premium finishing. If it will travel or stay on display, under-finishing usually costs more later.
For custom gifts, keep the design simpler than you would for a wall print. Small items don’t have room for dense image arrangements. A hero image plus a few supporting photos usually reproduces better than a crowded all-over layout.
Best Practices for Durable and Affordable Photo Collages
Most online advice about photo collages stays on the screen. It talks about style, not survival. That’s a problem because creators still need to choose materials, finishes, and file setups that make sense for real printing. As noted in this review of common collage maker tips, most existing guidance fails to address physical printing durability and cost-efficiency at local print shops.
The best budget strategy is simple. Spend where failure is expensive, and save where upgrades won’t be noticed. Use better source images, a suitable print surface, and protection for high-touch or long-term displays. Skip fancy extras on short-term pieces.
For event-driven projects, one smart companion approach is collecting more guest images after the event, then turning them into a follow-up collage or keepsake. A workflow like guest photo collection with QR codes can make that much easier when photos are coming from many attendees.
If you want the collage to feel more like décor than signage, mounted art products can be a practical middle ground. Canvas is often a good fit for lower-glare display and softer presentation, especially when reviewing canvas printing options for display use.
Use lamination for handled boards. Use archival-minded materials for long display. Use simpler layouts on small gift items. Those choices aren’t glamorous, but they prevent remakes.
If you need help turning digital photo collages into polished printed pieces, Business Mail Boutique LLC can help with photo printing, mounted displays, canvas, signs, finishing, and custom gift production in Sugar Land. Bring the idea, the photo set, or the finished file. Their team can help you choose the right size, surface, and print method so the final piece looks good in person, not just on a screen.

Related posts

Custom Memorial Glasses Engraved in Three Hours in Sugar Land
When a customer needed eight personalized glasses for a memorial, Business Mail Boutique completed the engraving or...

Custom Martini Glass Engraving in Sugar Land, TX
Custom Logo Engraving on Martini Glasses in Sugar Land, Texas.
Business Mail Boutique recently completed a beautiful custom engravin...

Custom Engraved Wine Glasses for a Golf Club Event in Sugar Land, TX
Custom Engraved Wine Glasses for a Golf Club Event in Sugar Land.
Custom wine glass engraving in Sugar Land, TX at Business Mail Bouti...